Saturday, 24 May 2014

Loosing a leg!!!


 Hello Cobra lovers, a little update on the progress of my build. On Friday the 2nd May my car was collected by the body shop and was off to get the prep work started ready for the paint. Very exciting stage of the build but frightening also as my garage would be empty for a good few weeks. I got recommended a local fella called Keith Flint (No not Keith Flint from the Prodigy) but a fella who runs a body shop in the next but one village. He has lots of experience with painting fibreglass and he was fairly knowledgeable on the car when he came to initially view it. The weekend the car was collected was also the weekend of the Stoneleigh show, this was a great show again and so much to look at and take ideas from. One tick off my list was to measure the stripe style i wanted for my paint job and get the exact dimensions. These were provided by an AK on the AK stand in the main hall. I was taking some really close up shots with my finger against for scale and the owner of the car (i forget his name) cam up and said "just measure them" then we swiftly ripped the front page of the Europa catalogue he lay that across the stripes and made marks on the edge of the paper. So that gave me the exact dimensions that i wanted for my stripes, and i was very very grateful. His car did look absolutely stunning and if mine looks half as good i will be over the moon.

So back to reality and a week of work. All my goodies from Stoneleigh stashed in the empty garage awaiting the return of my car. I did call past the body shop on my way back from work to check on progress and rest my mind that all was safe and sound. Keith took time to show me what had been done and i could see the effort he'd gone to. You can see in the image the whole car is taped down to the floor and every void has been sealed. This is to stop the dust from blocking down going all over the engine bay and under the car. Granted it wont stop it all and a fare amount of cleaning will still need to be done but its attention to detail and effort like this that rests my mind that hes going to do a good job. This image shows a basic prime and black guide coat ready to be blocked again for yet another primer coat.

Then after a second coat of primer and another guide coat its getting ready for a final prime before the colour is added, stripes marked out and then painted, then a final clear coat and rub down and polish. I have called in a few times over the past few weeks to just check out how things were going and get some pictures. Keith is also photographing each stage and said he will send me copies of them all, now that is a nice touch also and I'm sure not many places would do that without asking. My last update from Keith was that i should be getting the car back in the next couple of weeks, he has booked a slot in his diary for finishing all the big jobs and not to take on any little jobs until the big ones are done...... i somehow think the little series 1 drop head behind my car will be one of the massive jobs that may still be there in a few months.

With my garage empty and the light evenings well and truly here it was time to start making a proper home for my Cobra when she returns. This for me consisted of a few things, firstly the dust issue in the garage. This i hope to control slightly with the freshly painted walls, and the sealed painted floor. This has transformed the look of my garage and has had many a comment from every passer by, it has also made the area much brighter as the walls now reflect allot of the light and it all looks much neater and dare i say it professional.... but remember its still bloody small and tight getting a car in, but its all i have.


Another issue i had previously before the car left me was the tools hanging on one of the walls, they occasionally used to turn into lemmings and launch themselves off the wall to the floor bouncing off the car as they did so..... This will just not be acceptable after the return of a painted car, so the only option was to spend a daft amount of money (on top of a paint job) on a frigging great roller cab tool box. This was actually really good value for money, and has certainly sorted any tool storing issues i had, the only thing i overlooked was how bloody big it was!!! It came from the supplier just finished in dark gray but after a few evenings with some matt black vinyl and a few Shelby Cobra snakes ordered from China it now is a fully custom Shelby Cobra tool chest..... i wounder if i intended to do this cosmetic finish all the time? and i wounder if my car will get painted in similar colours and thus match the tool chest?? you will have to wait and see...... Yes i am a little obsessed or some may say sad!!

 So the garage is all tidy now, i might get a white tarpaulin to fix to the roof in the next week or so, as my budget for fancy sheet plywood has been well and truly blown on bloody great tool chests.

Next update might be some finished paint pictures for you all to look at...... exciting!!!

Tommy

Thursday, 24 April 2014

Body-Rocking!!!!


  Hello again Cobra fans, so more progress to report on my build, getting exciting as i have officially booked my body shop, more on that later. Firstly a big and very jealous congratulations to my friend who passed his IVA few weeks back, he hasn't broadcast it yet publicly so i will not name names, but huge congratulations for a first time IVA pass.
  I myself am making progress and aiming to pass IVA first time (well that's the plan) and in part of the process i have had to make some revisions to my filler cap. The hinge edge needs to be below the body recess in order to pass the IVA radius test. This is easily solved by rotating the filler cap so that the hinge points to the third leg of the roll bar. For some reason this created further problems for me. After speaking to AK a few times on this, checking that it wasn't me being a complete thick head, i concluded that i would have to solve the problem via a different solution. As mentioned previously i have booked the body shop for the paint job, so I'm in a mad rush prepping all the little bits now to save me crying later on. One problem with moving the petrol cap is that i couldn't stop the cap from hitting the body when open, and thus damaging the paint when done.

The fitting procedure should be fit the filler flange and cap and rotate anti clockwise until the cap has just enough room to miss the body. However for me to achieve this clearance ment my cap would fall foul of the IVA test with the sharp edge of the hinge point. So my solution was to stop the cap fully opening with a simple tie. I didn't have any ring terminals to hand so made do with some flat washers and some lockwire. I will replace this with a bit of bath chain and ring terminals soon to give a higher profile finish, but works perfect in practise. A large flat washer on the top of the cap with some lock wire running down to a small flat washer held in place with a torque bolt. The bolt has the second use of fixing the cap to the flange so it cant be removed (unscrewed) without taking this out. Its shocking to say but some Cobra owners have returned to their cars to find a filthy scumbag has removed the lovely filler cap as they are fairly costly..... so this should surly help deter anyone brave enough to try and take mine.


Next up was to tidy under the offside rear arch. I have a few wires running along here that are very exposed to the elements and potential of hit by anything coming off the tyre so it was time to "belts and braces" this area. Firstly the main battery cable was covered in a length of spare heater hose, this was an idea given to me to my mate who has just passed IVA. I spoke with him on the phone and was congratulating him and picking his brain regarding the IVA inspectors test and how in depth he went into things like this, but the solution with a length of heater hose split along to slide over is a perfect solution.... double whammy as it acts as a grommet as it passes through the body where it could potentially rub and split. I followed this up with a smaller section of heater hose around the main loom feed through then body also.... again belts and braces. I riveted a small length of aluminium to also hold the wires up back out of the arch and even further away from the wheel, just to be safe.


So with the petrol cap final position sorted and the underside of the arch also fettled i moved onto the roll bar escutcheons plates that i got for £10 from (shall we say) another kit car manufacture...... sorry AK i can feel the shame now, i feel so dirty. ha ha
  These did need opening up slightly with a file but with a little bit of adjustment they fit perfectly and will do a grand job of looking "bling" after the paint job. I will get some dome head polished stainless self tappers to fit them down, and seal with a little silicon to stop the water running down the roll bar also.


The offside escutcheon plate has to be moulded slightly to fit the contour of the body tub, but this is only thin gauge stainless steel, so not hard to achieve this taking your time and looks good.... all for £10 also, happy days!!

So with a few bits ticked off the list and the collection date looming for the paint shop there was lots of other bits to be doing ....basically stripping off everything that had been fitted. Window, exhausts, quick jacks, lights, reflectors, windscreen, bonnet locks etc.... loads and loads to do.


In fact all the bright work comes off fairly swiftly considering all the time it took to fit it all in the first place. But that's the reason its done like this so that re-fitting after paint should be just as easy, without the need to cut or adjust anything on the body anywhere.


Its like taking a huge step backwards removing all my lovely shiny stuff. And this in itself creates further problems. My youngest has now moved in to her nursery which leaves a vacant area in the bedroom for the storage of windscreens and side pipes. Its like a dream for me to share my bedroom with such exotic and glamorous parts, my better half doesn't agree..... well tough!!!

Stay tuned for an update soon.... it might even be some paint work pictures ;-)

Saturday, 1 March 2014

You spin me right round baby, right round, like a Halibrand.....

 Well where to start this update. Its a big one!!!

i will start with a niggle. If you are a follower of this blog you might recall my initial fuel filler hose setup. It was basically just a heavy duty rubber 50mm hose from filler cap to the tank. This is the conventional method that i believe most AK owners/builders go with. However because i had used such a heavy duty filler hose (really thick side wall) it had a little kink in it at the two most acute bend points. Although this is perfectly safe and acceptable.... it wasn't "belt and braces" enough for me.

 So i found a supplier of 2" (50mm) stainless steel 90degree bends (about £12 each) and i set about revising my fuel filler. Firstly i removed the slightly warped and kinked hose, and mocked up some templates for me to cut and fix the stainless steel tubing to. I had originally though of getting a weld at the middle point as opposed to the section of hose and clips either side. But welding isn't on my list of skills yet and this was still an experiment to improve the previous setup. The top join filler neck is held up with exactly the same procedure with a section of  2" hose, fixed nice and tight with the clips, and duplicated on the fuel tank also.

 One problem i could possibly see is that iv taken an instillation with two joints, one at the cap and one at the tank, and basically put a further 4 joins in it. Two now at the tank and cap and two at the centre point join. This potentially has the increased risk of a fuel leak now, but it looks allot better and I'm happy with it 10 times more than i was with the rubber hose. The filler hose/stainless pipe is exposed in the rear wheel arch and is open to all the road debris and weather, so the metal will stand up better in my opinion. I can (and probably will) get the centre join welded up still, and remove the need for the section of rubber hose..... "belt and braces"

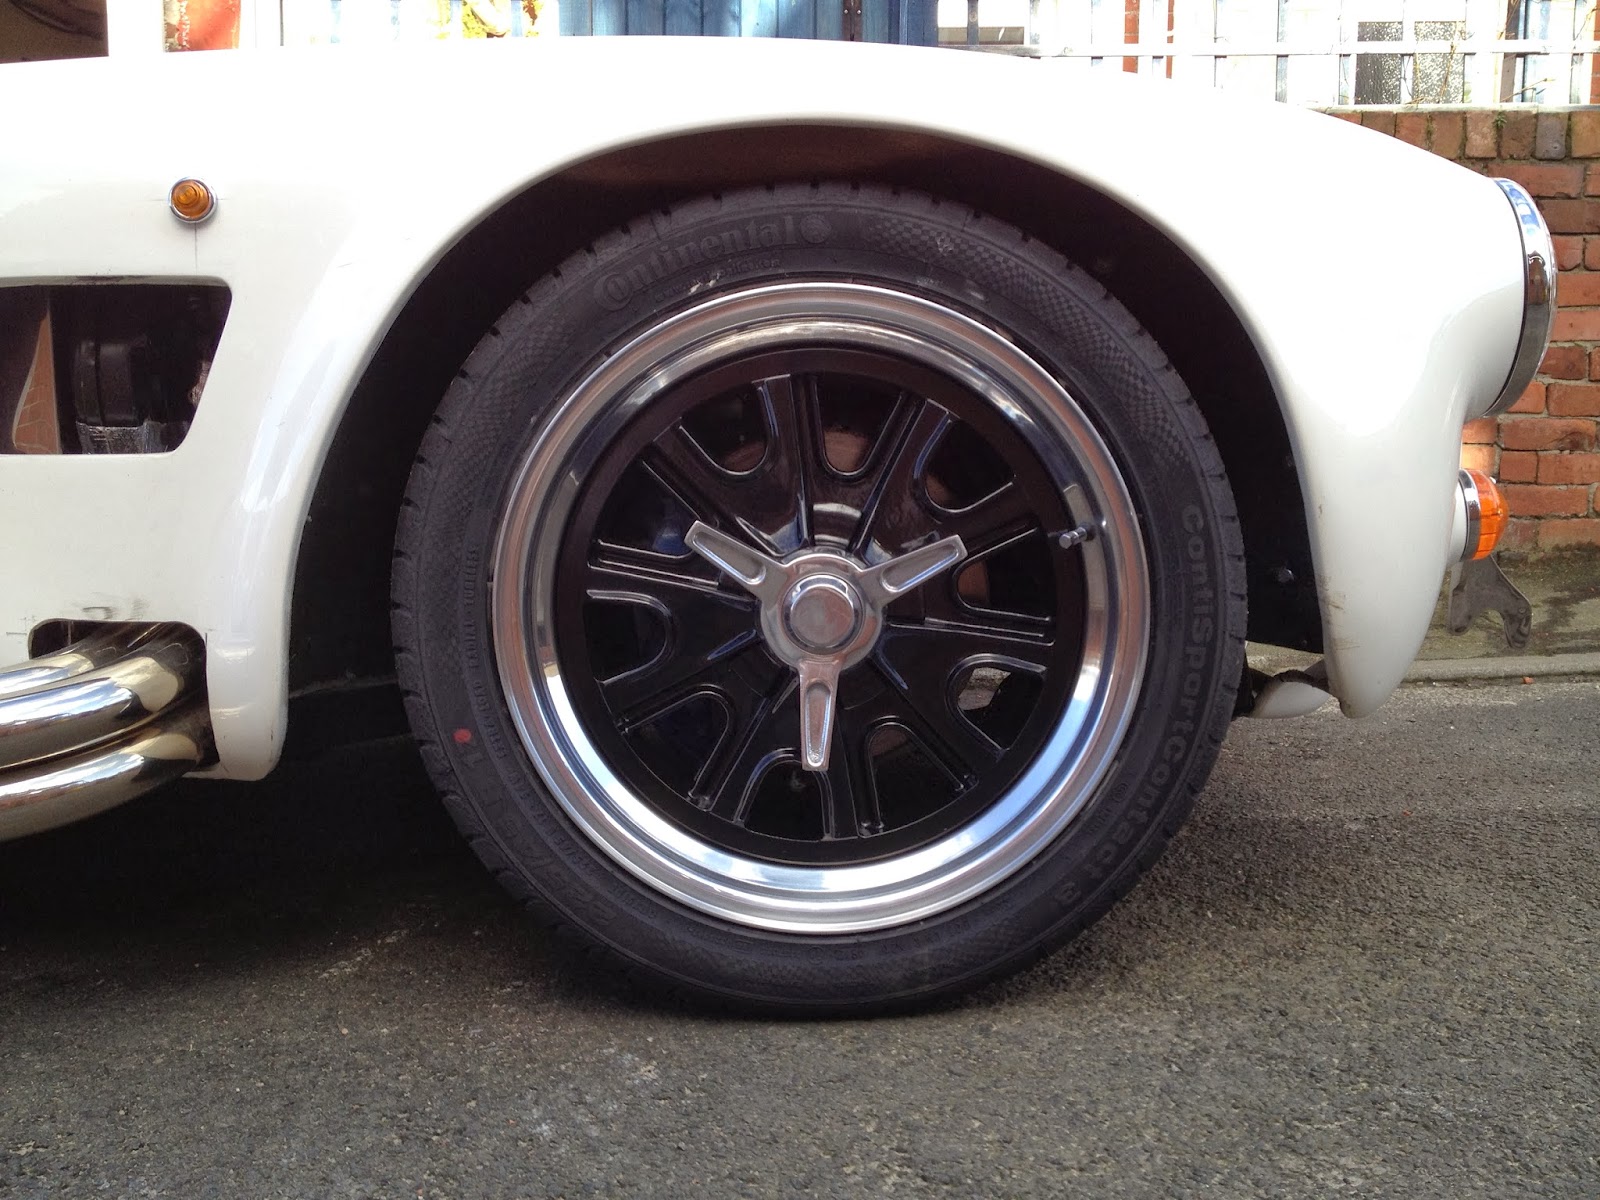
And now onto something very very exciting, WHEELS!!!! i have been saving for these for such a long time and after placing my order with Wendi they have arrived!!!!! the look flipping stunning i think and they will look superb against my final body colour choice and colour theme.

I went with 17" Halibrand replica CHB from Image wheels. Finished with wheel nut cover and centre spinner. 

The rears are a deeper offset than the fronts wrapped in 255/45R17 Continental tyres. I considered the Toyo tyres than many people have and like, but i have never had them before and i have had Continantal so i was happy to pay the extra and get what i feel is a better tyre.... never be a tight arse when it comes to tyres on any car. They are the bits that make you go very fast, but more importantly the bits that make you stop just as quick. You can have the fastest engine and biggest brakes in the world, but they will both be useless with shit tyres.
 
 So the wheels all fit perfectly and really fill the arch nicely, not to big like the 18" wheels with rubber band tyres, and not 16" with retro huge billboard tyres (although i do like those allot) so a happy medium with the 17" and replacement tyre prices are acceptable for such a high performance vehicle.

Next up was a modification again..... an extremely vain and cosmetic modification, but i had to do it.


I have always loved the huge bill board tyres with "Goodyear" printed in white on the tyre wall and especially as it gets weathered in and it just looks seriously cool in my opinion. A recent topic being discussed on one of the Cobra Forums split most people into two camps... "Like" or "Hate"  but for me i was 100% in the like camp. Within the discussion a link was given to a company in America who basically replicate whatever you want it white rubber and it gets bonded onto the tyre to give the desired look. This was a done deal as far as i was concerned, and i swiftly made contact with them and placed an order. Have a look at the gallery link and try to tell me these muscle cars don't look shit hot with the white letters on the tyres TredWear Gallery

So with my letters on order i tried and failed to upgrade my tyres again so actual "Goodyear Eagle F1" tyres.... however they are unavailable in the sizes i needed, so not only is my car a replica.... but my tyres are also...... Continental ContiSport replicating Goodyear Eagle F1. hehehe you have to laugh really.

So with the front letters bonded on the look is really starting to come together. I am chuffed to bits with how the wheels and tyres all look now and the difference it has made to the appearance of the car is staggering.

I will be doing the rear wheels also with the white tyre letters..... but i was an "R" short when i got them so I'm just waiting for it to arrive and i had suffered enough of the still bloody freezing winter weather.
 Some more pictures below prior to putting the letters on...... until the next update, Enjoy!!!   


Tommy

Saturday, 18 January 2014

Getting Wood


Well with the festive season well and truly behind us, and the sale of one of my personal cars, for the greater good. I have/had a large wad of cash which needed spending fairly quickly before it gets frittered away on trivial matters.

So first on the cards was my final fit steering wheel which is a 14" Moto-lita, dished wheel with (Cobra) teardrop slots. These are available in a few different sizes anything from 13" up to 16" but after some helpful advice off one of the forums i settled on this one. Its what i had initially thought was best for the car and I'm glad i went with this style, as it looks bloody lovely in my opinion. I have also up-speced and gone with a plane polished 3.5" centre horn push, and polished adaptor plate for my 6 bolt 75mmPCD hub, as the standard Moto-lita is a 9 bolt 100mmPCD. I could have saved a few quid and got a plane black one, but if a jobs worth doing its worth doing properly.

So including the collapsible hub which i got from Europa a few weeks back, i didn't get much change from £300, and further work will need to be done to get the wheel IVA happy as it will currently fail in the radius test on the spoke edges. However i have fitted it temporarily and it looks and feels lovely. And when the rest of the interior is fitted (after paint)  it will all start to come together and look just how i wanted it. Still so much to do and space is getting seriously tight now in the garage, I'm getting sick of not being able to walk past the car without catching the wing mirror or my shins on the exhaust. Something will have to be done, as this will potentially damage the paint when that's done...... New house/garage please!!!

So another update soon (it will be a good one trust me!!!) as its cost just over £2500, just got to wait now.

Sunday, 29 December 2013

Mirrors and babys

 Happy Christmas and happy new year to all of the followers and readers of my blog. I start on good news with the birth of my daughter Poppy. She was born not long after my last update on the 25-11-2013 and another official Geordie to add to the growing family.

So with Christmas just a few days back it was time to "Man-Up" and brave the bitter weather on the top of my mountain in Burnopfield and fit some Christmas presents.


First on the list was a collapsible steering boss from Europa. This is an IVA compliant part as it is a collapsible boss in the event of an impact, and i now just need to find an acceptable steering wheel that is compatible and will look right for the car. i have a few options in my head currently, but just doing some research before i buy one.

Next up was some wing/side mirrors. These were a Christmas present from the better half at request of myself. I have fitted them for the moment, but i don't believe they will pass the blasted IVA test, so they will probably be changed at some point for something compatible.


Isn't really rocket science fitting these, a simple 10mm hole in the correct position then secured underneath with a large penny washer, lock washer and nut. My mirrors have a rubber grommet between the stalk and the body so this is good to use as a template of where to cut. the picture here shows the grommet on my initial position. I since changed my mind (filled the hole) and moved a bit further back, reason being was if i mounted the passenger side mirror in the same position then it would have blocked all vision from the pillar of the screen.... and thus being useless. So i moved them both back about 1.5" to give better vision. The reason i fitted it further forward firstly was that i was conscious of the side screens that will be fitted at some point in the build (not purchased yet) and i didn't want them to void/hit the mirrors, but in my process of solving a problem that didn't yet exist, i created another with the visibility of the nearside mirror and the windscreen pillar.... bugger!!!


You can see with this picture and the fitting position that if it had been further forward then how restricting the visibility would have been. Never mind.... I'm getting quite good with filling holes that have been put in the wrong place now, lucky all this is being done prior to paint finish.


Ignore that hole that hole that has been filled. The fixing underside was a sod to get to in the initial position, so in hindsight the revised position is better for access for fitting, and shouldn't create any major issue with the side screens.... i hope.

Once they were both fitted it was time to sit in and see what visibility was like. and to be fair i wasn't to disappointed, they will probably shake like a shitting dog when the engine is running and be next to useless but from a cosmetic and style perspective then I'm very happy with them.... and after all this isn't a car being built for practicality.


 Next up was the rear view mirror, which is mounted on the centre of the top scuttle. Again i will have to check if this is IVA happy as in its pictured state here it will fail on the radius of the mirror. I have got a black rubber sleeve that goes around that i think should see me right but will have to check to be 100%. IIRC i need something to cover the mounting flange as this might not have the desired radius. So another bit that might have to get changed at a later date..... the list is starting to build up now. ha ha


Looks nice mind, and again very simple and logical to fit, with a nice rubber grommet between the stalk and the body to be used as a guide as to where to cut/drill. I chose the scuttle mounted mirror as opposed to the top mounted mirror (which secures to the windscreen centre strut) due to reports of serious vibration through these types rendering then next to useless. I'm sure an element of that will be valid on this type also, but who cares whats behind you??


I need to make a few alterations for the windscreen lower bracket and centre support, as again i believe these are an IVA fail point, however in order to make the adjustments i need to remove the screen again, and by this point i was to bloody cold and fed up with the constant streaming from my nose so that will wait until the weather warms up..... that could take a while!!!


Another last shot to accentuate how small my garage is and the near primitive conditions that I'm building this monster in.... its a combination of a very wide car and a very narrow garage. Anyone who has a nice size garage with insulation and heating id better never here you complaining.


And to finish this little and abysmally overdue update i would like to pass my regards and thoughts to everyone in the AK team in Peterborough and all the Freeman family who sadly lost Lynda Freeman (Wife of Ken) to cancer just before Christmas. A sad loss to everyone and my sincere condolences to all.

Tommy


Tuesday, 12 November 2013

Registering Interest


I don't have a lot to report I'm afraid, so i apologise to all you regular followers of this blog. I do however thoroughly enjoy receiving emails and contact from complete strangers saying how they enjoy reading this blog and how it has helped them with their build. I have never claimed this to be a guide for building this car but only my experience and how i have done it, so i take great pride in people contacting me for advice as they are mimicking my ideas or it has inspired them to start a build.


So my current situation is still "skint" basically. My second child is due any day now, so priority's have had to change... but only slightly. One step in the right direction is a new registration number for the cobra.

I contacted the DVLA many months ago to request information on the reg "TEJ 82F" which is my initials and date of birth. They informed me that the reg had never been assigned to a vehicle and that i could request it to released and entered into auction. So i was pleasantly surprised when i received an email last month letting me know i could bid on the reg through a timed auction. I had already made my mind up that i wanted this reg for the car when finished as it was 100% personal to me and in keeps with the original age of the Cobra, as this plate is a August 1967 – July 1968 issue. This should be no problems to assign to the car when finished as the rules state you can make the car look older, just not younger, and with all my donor parts being from an 89 this should be fine.
 I admit i couldn't really afford this at the moment and money could be spent on more practical things for the car. But including all transfer fees, retention for 12 moths and the evil VAT it came in for under £500 and so out came the credit card and now its mine.

I should now be able to finish my rear numberplate bracket (which hides the boot lock) as i have the final plate confirmed to fix onto it and arrange fitting. I might have a different reg assigned first and then transfer this one over, but i believe this is just paper/admin work when registering after IVA.

More progress soon i hope. keep the faith!!!

Sunday, 15 September 2013

Reflection is Perfection.


 Just another little update for your Cobra lovers of the world, this time I'm doing the rear reflectors, which are a legal requirement for IVA test and future MOT tests.

Initially i didn't want permanent reflectors on the car, I was just going to get some little sick on ones that would have been IVA compliant for the test, and I'm sure they would have fallen off at some point on the return journey home, but re-attached them self's for the MOT years down the line.

My reasoning for this was because i didn't want the back end of the car to look to cluttered/busy or have to much going on.... Less is more for me.


 However with my recent addition with the stand offs for the fog and reverse light i was on the prowl for some similar style reflectors. I cant really remember where i initially got the idea for these ones, i think it was my brother in laws new motor when i saw that. They are the rear reflectors off a Mitsubishi L200 and similar to the fog/reverse stand offs they are contoured to the rear of the bumper and thus fit the rear of the Cobra very well also.

I managed to get a pair brand new through eBay for less than £10 so like most bits lately, not exactly massive expense for a part that looks correct and less of an afterthought. They are fitted with a single bolt through the centre of the unit, which you just clamp into position with a nut. You can see on the picture the little hole in the rubber which is where they had a little locating lug for each one (offside and nearside) this i just simply cut back as i don't want to cut more holes in the body than i needed to, I presume the bumper of the L200 has a recess for these to slip into.


  Next up was to measure a thousand times and drill a mounting hole. I mocked them up first with blue tack to get a good position and play around with the location of them. The IVA does have specific rules regarding the position of these reflectors. Basically in a nutshell they can be fitted anywhere on the rear of the car so long as they are red in colour, mounted lower than 900mm above ground level and above 250mm ground level along with within 400mm from the edge of the car. I tick all of these boxes with my final position so these should not fall foul of any IVA testers checks. But there is also no limit to how many reflectors are fitted so if for any reason that these cause issues i can just use some stick on ones for the test not that i should need to.


 You can see now with this picture of the back end about what i mean about it getting cluttered and busy, lots going on and looks a little uneven with the red of the fog and the clear of the reverse. This will be solved by the use of an red LED bulb for the fog light, but with a clear lens on so it should balance it out a little.


  With this close up shot you can see how they mimic the fitting of the fog/reverse, so keeping the theme at the back and looking like a professional fitting unit.

This will all get tied together nicely with the final body colour and the stripes... when i finally get that sorted.

I'll end this update like I've ended my last few.... Still saving for bigger bits, feel free to send donations.